Thanks Mona for the tutorial and to Beate for the visual tutorial! Tissue Flower tutorial found in the resources here at SCS.
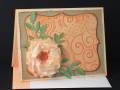
I wanted to create a tissue flower but didnÂ’t have the appropriate tissue paper color so I figured this mulberry paper that has been in my stash about six years would do the trick and I like how it turned out.
Now the question isÂ…once stuffed into an envelope and mailedÂ…just how 'purty' is it going to be! Now I remember why most of my cards are flat or near that! I'm sure it'll look presentable when removed from the envelope after travel.
-The flower is cut from mulberry paper with the Shapeabilities set Flower Creations 3. I used the sponge and applicator from Ranger to ink distress it. To get the petals to curl I used a corsage pen and thumb.
-I used the shimmer spray I made with Pearl Ex and hair spray to add sparkle to the flower and leaves.
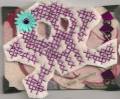
-The dry embossed panel is white scrap pieces run through the Cuttlebug with different embossing folders. I then placed them on a one sided sticky paper and cut with the Top Note die and ink distressed. The sticky paper can be sticker paper or the large mailing labels also work fine.
-For the Top Note border I die cut a second piece of cardstock then cut point to point each way and I find it easiest to tape it back together after the first cut to line up the points for the second cut. I use repositional tape (blue painterÂ’s tape).
-The leaves are ink distressed.
-The inside is a strip of cardstock embossed, ink distressed and glued to the card. That side edge of the card also got ink distressed.
-The envelope was embossed, masked off and ink distressed.
Tools: Shapeabilities Flower Creations 3, Stampin Up Little Leaves die, Martha Stewart Frond punch, EK Success flower punch, Cuttlebug and embossing folders, corsage pin, Ranger sponge and applicator, Tonic paper perforator for distressing
Paper: White, ArchiverÂ’s watercolor paper, unknown names for mulberry paper, sticky paper and colored cardstock, Stampin Up green
Thank you so much for the info on your beautiful card. I love that the directions are with the card and I do not have search your entire blog for the the info. Although, Ihave really loved some of the blogs I have read bc of this! hehehehe
It is awesome and I looooooooove Orange!!
Registered: April 21, 2007 Location: Mesa, Arizona Posts: 24458
Mon, Apr 26, 2010 @ 2:12 PM
Gorgeous as usual and what a magnificent job you did on that flower. I don't know which I love most, the flower or that patchwork background but I definitely feel a CASE coming on. TFS for sharing your fabulous work with us. You're the greatest....
Registered: February 2, 2008 Location: Phoenix, Arizona Posts: 3607
Mon, Apr 26, 2010 @ 9:23 PM
I am so happy to read you enjoyed the tutorial Your card is stunning! The flower is beautiful & I love all the texture Thank you for the shout out & for giving the tutorial a try TFS
Registered: May 18, 2008 Location: Michigan's U.P. Posts: 1951
Tue, Apr 27, 2010 @ 11:09 AM
Rox, your card is beautiful...as usual! I had to LOL at your comment about it going through the mail...funny but oh so true! I really liked how you embossed the Top Note, very creative! TFS.
------------------------------ Ann Fan Club Member You're off to Great Places! Today is your day! Your mountain is waiting. So...get on your way! ~Dr. Seuss
Registered: December 21, 2008 Location: England Posts: 28
Wed, May 12, 2010 @ 5:38 AM
You have shown me so many techniques on this one card, and have really inspired me to have a go. Have never come across this idea of patchworking various cuttlebugged backgrounds then die-cutting. Brilliant. And the idea of cutting up a second top-note diecut as a border - another brilliant. I will try both of these ideas, hope mine will turn out even a fraction as lovely as yours. Thankyou.


 TFS!
TFS!